Date: 2 September 2007; updated 3 Nov 2007
Download this article as a PDF file.
I'm on to an idea here...so forgive the article length. This idea might just change the way I knit.
Knit Smarter?
I am not the first to wonder if the way patterns are written sort of set us up for disappointment. Most patterns have you cast on at the bottom edge of a garment, and then knit for a month, or a year, before you start shaping for bust and arms. Have you ever knit a sweater, after months and months of anticipation, only to find that it doesn't fit, despite gauge work done up front? There must be a better way.
You have already seen my leaning in my online guides for Socks and Hats. Everything we make should fit! We build it one stitch at a time, we should be able to figure this out!
Raglans make it easier.
Making a Raglan shape means that you can try it on from the start, insert short rows for the bust and waist shaping because it can be tested as the garment grows.
Knitting in the round also simplifies your life.
Raglans knit from the top down, are, by their nature, easy and seamless. You cast on at the neck with circular needles and knit round and round, creating the sweater downward.
Examples:
Woolworks has a "fill-in-the-blank" raglan calculator.
Many patterns from Knitting Pure and Simple are raglan style.
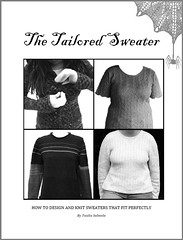
The book Fitted Knits by Stefanie Japel also offers examples of top-down knitting using raglans and fitting. See a knitting example at Stefanie Japel's site - illustrations in the build of a raglan. Stefanie approaches the problem of fit with great common sense and the garments look great.
Round Yokes Also Make Life Easier
A round-yoke sweater gives you a different field to design on (increases in the yoke are randomly placed, unlike a raglan). They can be knit in the round, top-down.
Examples:
Design House: Bohus Stickning Round Yoke Sweaters (History and details in the book, Poems of Color by Wendy Keele)
Jared Flood's Oatmeal Cobblestone (although not knit top-down, it could be)
JWS Top Down Round Yoke Sweater Pattern - Joan Scoggin inverted Elizabeth Zimmermann’s Percentage System to give us a top-down pattern.
Others have considered the problem
Barbara Walker wrote a book title "Knitting from the Top" where she explores the idea of knitting purely from the top down, incorporating the shoulder into the knitting. The book consists of narrative and some illustrations. I applaud the concept, but the narrative falls short of fully illustrating the idea. If there were more pictures, I think I could really get it. Alas.
My favorite heretic, Annie Modesitt, offers patterns from the top down too. Learn how to make a beautiful corset style shell from the top down with her Red Carpet Convertible (buy it, and be a better person for it too.)
Sally Melville explores knitting in all directions in her book “Knit” with the Einstein jacket (on Ravelry). Brilliant!)
Build on an existing theme?
In-the-round, raglan or round yoke sweater/cardigan information is readily available on the Internet. But what about creating set-in sleeve designs? How would you knit that from the top down?
Maybe you don't. Start at the middle, work up, then work down.
So many patterns are configured and calculated bottom up, that by adopting a top-down philosophy means you almost have to sign up to design all your own garments too. Not an impossible task, but not everyone is up for it.
What if you took a design you liked, and instead of casting on at the bottom, you use a provisional cast on and start just below the sleeve shaping? Knit to the shoulder. Bind off the shoulders with a three-needle cast off (or cast off normally and sew the shoulder seams.)
Knit the sleeves according to the pattern. Sew them in the armholes. You can try the top on as you go. Admittedly, you will be building from the bottom up sorta, but your time investment in knitting before you know if the fit works is minimal.
Then, pick up the provisional cast on stitches and knit in a downward direction until the garment is the length you want it.
Examples?
Right now this is a concept that I have to prove...but I have a few swatches to show.
Crochet Provisional Cast On
Cast on as many stitches as you need per the pattern/per your gauge swatch, using a smooth and different colored yarn than you'll be knitting with. Tie a knot in the yarn tail at the start of the cast on.
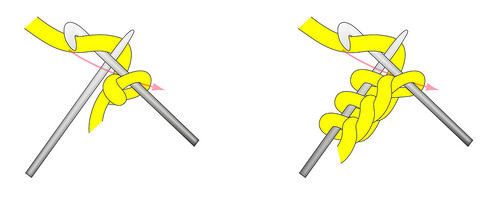
(click the image for large. Illustration by Carol Brozman, thank you Carol!)
Illustration Left: With a little extra yarn to leave a tail, make a slipknot on the crochet hook as illustrated. Hold crochet hook in one hand, and knitting needle in other and lay the needle on top of the yarn. Pull yarn through the loop on your hook, on top of the needle, making a stitch on the needle and pulling through forming one chain stitch below the needle.
Illustration Right: Bring the yarn around to the back and repeat pulling your yarn through and making a crochet chain. Repeat for as many stitches as needed for the provisional cast on. Remember to tie a knot at the end of the tail at start of the cast on.
For later, when you need to remove the provisional cast on, start at the opposite end of the cast on tail (the yarn tail/end that does not have a knot.) Unravel the crochet cast on until you can pull each loop out (do this one at a time), inserting the knitting needle in the now exposed loop so it doesn't drop!
Knit in Two Directions
Isn't the knitting directional and you'll be able to see a line when you went from bottom-up to top-down knitting?
Not that I can tell using either garter or stockinette.
I would expect that many patterns will work in this directional way. I am pretty sure that ribbing and lace, and knit/purl texture stitches could also be knit bi-directional.
Here are my two examples – I started with a provisional cast on (no longer visible here as it has been removed) and knit with the purple yarn first. I then cast off the purple yarn. Then I unzipped the provisional cast on (one stitch at a time) and put the loops on my needle. I then continued the stitch (stockinette or garter) with the purple yarn, knitting a few rows then casting off.
I used two colors of yarn so you could see the directionless of the knitting when complete. These samples are knit flat.
Bi-directional Garter Stitch - two colors to help you see each direction. This is the same sample, flipped vertically so you can see knitting looks the same in both directions.
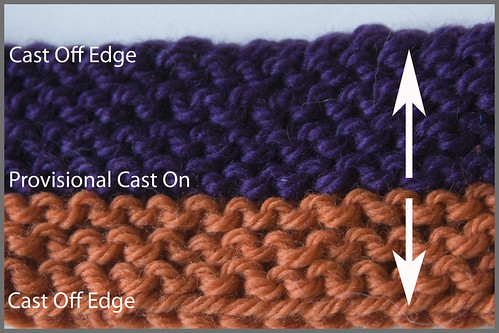
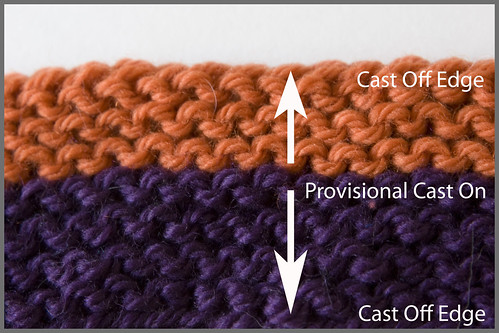
(click the images for large.)
Bi-directional Stocking Stitch (also known as stockinette) - two colors to help you see each direction.
This is the same sample, flipped vertically so you can see knitting looks the same in both directions.
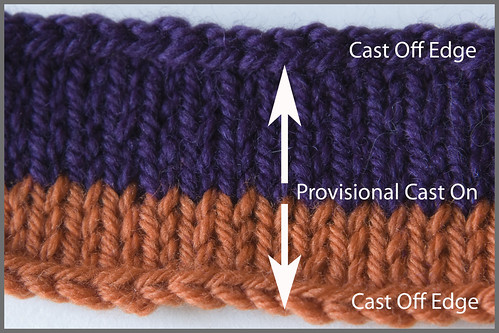
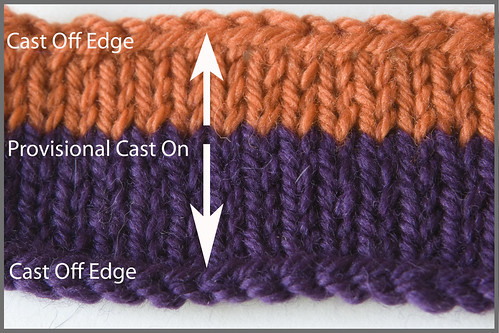
(click the images for large.)
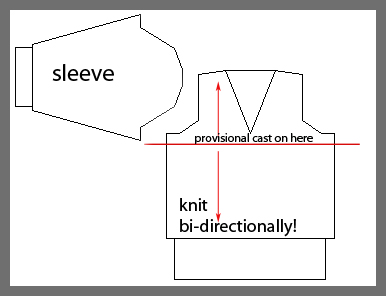
How might we do this?
Here is a simple schematic with arrows to indicate where to start. Now that I've played with this idea in my head...time to test it! Want to try this concept with me? Write me at: onemorerow at charisa martin cairn dot com (remove spaces and use the @ and the . where the words are.)
Here's to the idea of knitting smarter! Let's play!
The dialog is underway!
Follow up comments were posted on the P U L S H online fiber arts journal, as well as on Ravelry.
Honeybee33 posted this comment on 10 September 2007:
I've tried multidirectional knitting quite a bit, and it's a challenge to make sure the stitch-pattern you use is conducive to the technique. Because a provisional CO moves the stitch-pattern over just half-a-stitch, you need to use something that doesn't show that shift, like stockinette, garter, etc. Most horizontally-oriented stitch-patterns work, but anything vertically-oriented, like ribbing or seed-stitch, can be a challenge, if completely unworkable. Lace is tricky, too, because the holes usually form a discernible pattern that is thrown off by the shift.
One alternative is to create some type of design element that occurs at the CO to break up the stitch-pattern, like a stripe of garter or purl, or use a complete change of stitch-pattern for each direction.
Carla, of “More Than One Way To Knit a Hat” blog, posted this comment on 10 September 2007:
“The half shift is going to happen whether it's knit in the round or flat.
A row of knitting looks sort of like this:
nnnnnnnnnn, with the bottoms of the ns all connected up in between your stitches.
When you take out your provisional cast on, you're freeing those loops connecting the ns. It looks like this: uuuuuuu. (This would work so much better in a sans-serif font!) Your existing knitting is attached to the loops connecting the us. You've moved over half a stitch and are knitting on the old connectors instead of the old stitches.
In garter stitch and stockinette, you can't tell that it's a half stitch off. But in anything else, it will show. Or so says EZ, and I always trust EZ. I would assume that it would also show in stranded stockinette.
You might want to look up Teva Durham's Lace Leaf Pullover (link to Ravelry) from a back issue of Interweave Knits. It's knit two ways (I don't remember if it's to the middle or from the middle) so that the leaves will point in the right direction at the hem and at the collar.
I'm not sure what you mean by "row right around mid body".
Hope that makes sense; I'm not sure I'm explaining myself clearly :-/
carla
Still, food for thought
The comments on P U L S H and on Ravelry help illustrate some of the “gotcha’s” knitting bi-directionally, but it’s certainly worth considering for your next sweater project.


